_edited.jpg)
Migrating from QuickBooks Desktop to QuickBooks Online
Table of Contents
-
Introduction
-
Preparing to Move Your QuickBooks Desktop File
-
Exporting Your QuickBooks Desktop File
-
Preparing to Import Your QuickBooks Desktop File to QuickBooks Online
-
Importing Your QuickBooks Desktop File to QuickBooks Online
-
Troubleshooting Common Issues
-
Conclusion
Introduction
Moving your QuickBooks Desktop file to QuickBooks Online can seem like a daunting task, but with our guide, you can rest assured that the process will be smooth and stress-free. Our step-by-step instructions and expert advice will help you successfully migrate your data to QuickBooks Online. If you are using QuickBooks Desktop Enterprise you may look into downgrading to QuickBooks Pro for better experience instead of taking this huge leap to the online version.
Preparing to Move Your QuickBooks Desktop File
Before you begin the migration process, there are a few things you need to do to prepare your QuickBooks Desktop file. Firstly, make sure that your QuickBooks Desktop file is up-to-date and has been backed up. Secondly, ensure that you have a stable and reliable internet connection as the migration process requires an active internet connection.
Exporting Your QuickBooks Desktop File
To begin the migration process, you will first need to export your QuickBooks Desktop file. This process involves creating a backup file of your data in QuickBooks Desktop that can be imported into QuickBooks Online.
-
Open your QuickBooks Desktop file and click on the "File" menu.
-
Select "Utilities" and then "Export".
-
Choose "Lists to IIF Files" and then select the lists you want to export.
-
Click on "OK" and save the IIF file to your computer.
Preparing to Import Your QuickBooks Desktop File to QuickBooks Online
Once you have exported your QuickBooks Desktop file, you can now begin preparing to import it into QuickBooks Online. This process involves creating a new QuickBooks Online company file and importing your data from the IIF file you created in the previous step.
-
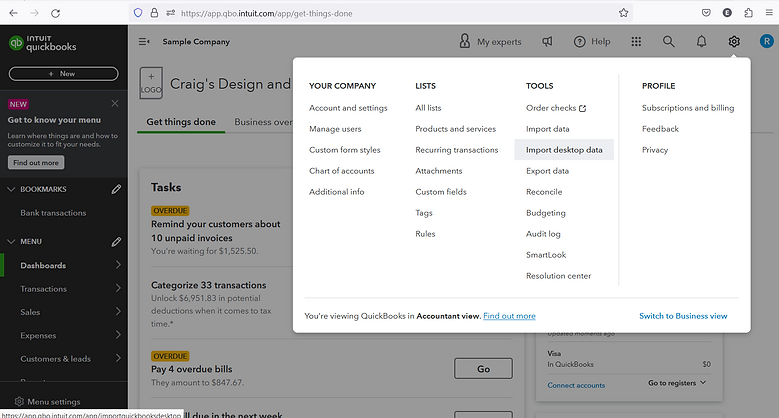
Log in to your QuickBooks Online account and click on the "Gear" icon.
-
Select "Import Data" and then choose "QuickBooks Desktop".
-
Follow the on-screen instructions to upload the IIF file you created earlier.
-
Once the import is complete, review your data in QuickBooks Online to ensure that everything has been successfully migrated.
Importing Your QuickBooks Desktop File to QuickBooks Online
With your QuickBooks Desktop file exported and your QuickBooks Online company file created, you can now begin the process of importing your data into QuickBooks Online.
-
Open your QuickBooks Online account and click on the "Gear" icon.
-
Select "Import Data" and then choose "QuickBooks Desktop".
-
Follow the on-screen instructions to map your accounts, customers, and vendors.
-
Once the import is complete, review your data in QuickBooks Online to ensure that everything has been successfully migrated.
Troubleshooting Common Issues
Although the migration process is typically straightforward, there may be some common issues that you encounter along the way. Some of these issues may include missing data, duplicate entries, or errors during the import process.
If you encounter any issues during the migration process, refer to our troubleshooting guide for expert advice and solutions to common problems.
For Help with QuickBooks Mac to QuickBooks Online migration Click Here
Related Links :
Tips and Tricks to Convert QuickBooks Enterprise to Pro
QuickBooks Conversion: How to Switch from Different Accounting Software